AHEIDEMANART.com
  • home
  • Ceramics
    • Ceramics daily blog >
      • ceramics clean up
    • Projects assigned >
      • project progress scales
    • ceramic videos >
      • video demos
      • Aheidemanart on youtube
    • Ceramics documents..
    • ceramics rubrics & scales
    • hand project still demos
  • 2D art
    • Drawing and painting blog
    • 2d class documents
    • drawing & painting tutorials
    • rubrics
    • 2-Dimensional scales
    • 2d assignments
    • extra credit in 2D
  • File Cabinet
    • philosophy of education
    • Course content
    • art elements
    • rules >
      • rules of the road
      • the fine print
      • Classroom covenant
    • Grading >
      • Work Log
      • project sheet
      • writing a paragraph
      • end of quarter self - evaluation
      • end of the SEMESTER evaluation
      • presentations learning targets
      • clean up ticket
    • Teamwork >
      • employablitity skills grading worksheet
    • scheduals >
      • bell scheudal
      • FINALS SCHEDUAL
      • afternoon assembly schedual
      • confrence shedual
    • substitute teacher info
    • what is ms. h like, anyway?
    • how to make a weebly site
  • Links
    • contact page
    • student blogs
    • advanced & AP 2013-14
    • link to model advanced page
    • link to 'vintage' site
  • Galleries
    • 2D gallery
    • Ceramics
    • Advanced ceramics
    • RAKU!
  • AP student info
  • tutorials
  • Ann talks
  • events!! Blog
  • festival of the arts entry form
  • ceramics club page
  • 2d gallery
  • 2 d gallery blog
  • scheduals
  • parent events
  • New Page

How do I get credit from my group coil project?

9/29/2017


show me the pink sheet and the finished project.
have the advanced or intermediate team member post of photo of the object being received or being used by the recipient of the gift on their grading blog.
everyone will get 25 project points when this is done!
(if there is not adv/int team member then talk to me about an alternative)

Somethings to remember with a firm slab

9/28/2017

 
Picture

make sure the sides are leather soft when you put them together.
put together a base and tow adjacent sides first.
Make sure you 'stitch' them together AND add a small coil. Pinch the outside corners so they are sharp, now add the next two walls sealing in the third one then the fourth.

intermediate and advanced students - fill in the bottom row of the yellow sheet! or risk losing lots of points. Make sure you have blogged this week.

making a firm slab project

9/27/2017


Why is a firm slab different than a soft slab?

- for a firm slab one cuts out the shapes and then lets them get firm before putting them together.
​-the project should have straight flat walls.

demo here
and here


September 26th, 2017

9/26/2017


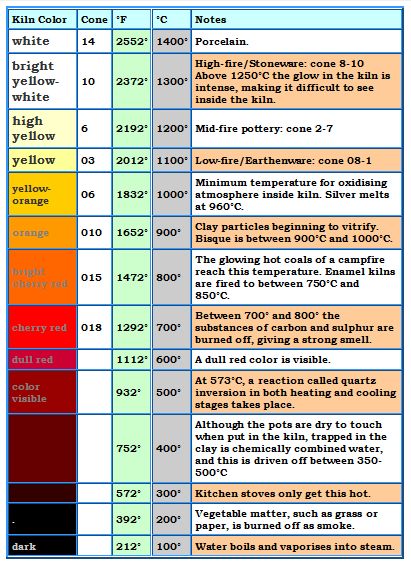
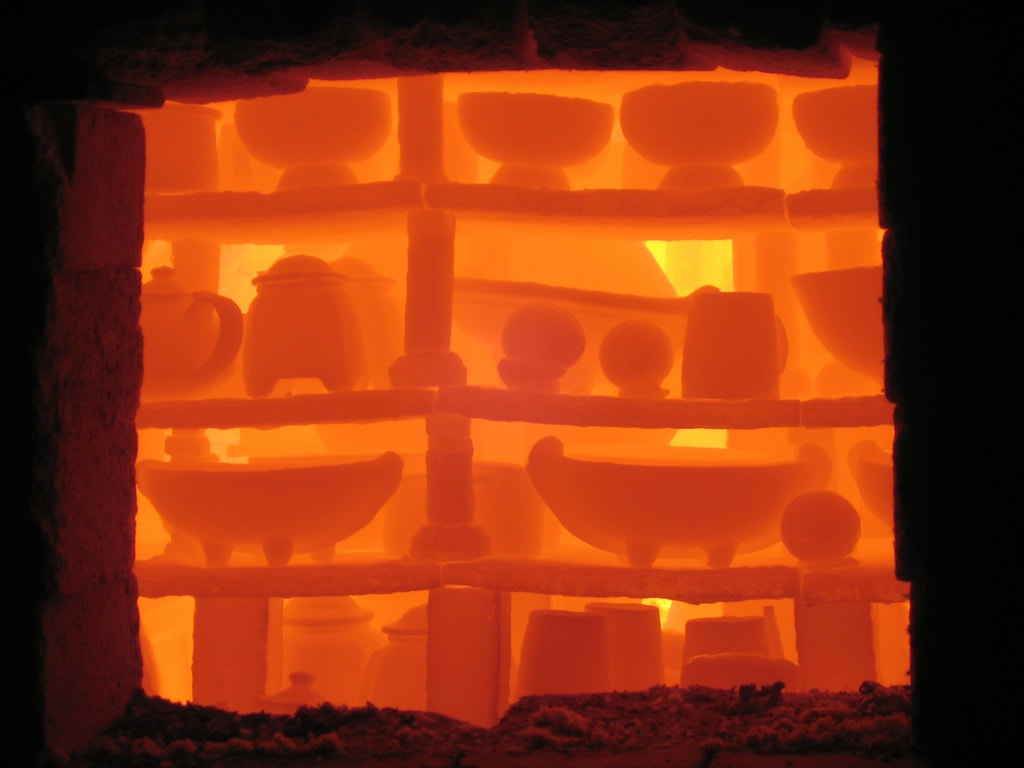
What are the two basic fierings called and why are they different?*

What are the basic kinds of kilns and why are they different?**

What are some basic glaze firing techniques we can do here?***


* bisque - first fire cone 04 aprox. 1800 degrees F
glaze - second fire for us cone 5-6 aprox 2100 degrees F

**kilns are either electric or fuel fired - they burn gas, wood, charcoal or other.

***One can get clay and glazes to use specifically at a variety of temperatures - see chart below
low fire - often used in elementary school or bright colored table ware cone 04-02.
mid range 3-6 ---this is where we normally fire - can use as dishes
​
high fire 8-10. -- we can fire this hot in the gas kiln with specific clay for specific needs. Available for A.P. and continuing advanced students.

Picture
Picture

​This is looking in a glaze kiln in process -- when it gets 'high yellow' the glaze is melted 
and the clay body gets 'soft'
 -- it can subtly change in form
one of the reasons to fire lids on their base pots.

How to write a ceramics grading paragraph

9/25/2017


​When my projects come out of the kiln, in order to get credit for it I will finish my pink sheet, write a paragraph on the back and show the project and paragraph to ms. H.
On today's notes I will write  how to write the paragraph (see below)
​

When I write about my work to turn in -- I will write  paragraph in this order ---
what is it - the media - in this case describe the project
form - surface - color --- in that order

how we made it - the skills
how it uses art elements - focus on one or two
to create design elements that create a composition that
shape the viewer's experience of it is - 

in other words how it makes them feel, react or  how it makes them think.  - remember the 3 parts of the brain. :)

here is an example

Keeping clay workable and numbering my work log

9/21/2017


I can keep clay wet and workable as long as I like as long as the plastic bag is sealed.

When I  make something before a week-end or break I will MAKE SURE it is wrapped up in plastic because if it dries out I will have to put it in the bucket to get recycled.

I will put my class list number in the upper left hand corner of the paper so Ms. H can alphatize them more better easily. :)  
Hint -- listen as Ms. H tells you your class roster # It has changed since last week.
Note Intermediate put an I and Advanced put an A on the top. no number needed. Thank you very much!!!

How to glaze

9/21/2017


glaze is the layer of 'glass' we fire onto clay to make it impervious to water and other substances.

glaze is made largely of silica, alumina, and clay as well as a metal compounds, for color. For instance  copper oxide will make green, iron oxide can make black or deep reds.

Glaze particles are suspended in water, put on the project and then fused into the clay surface in the kiln.

​please see - how to glaze here.

​
for your first pinch and coil projects you will do a base color that will show texture - then add clear and detail colors as desired. 

some examples  
​http://rachaelsart.weebly.com/ceramics.html

Preview of a soft slab project. I am out but make sure you look at the demo.

9/20/2017


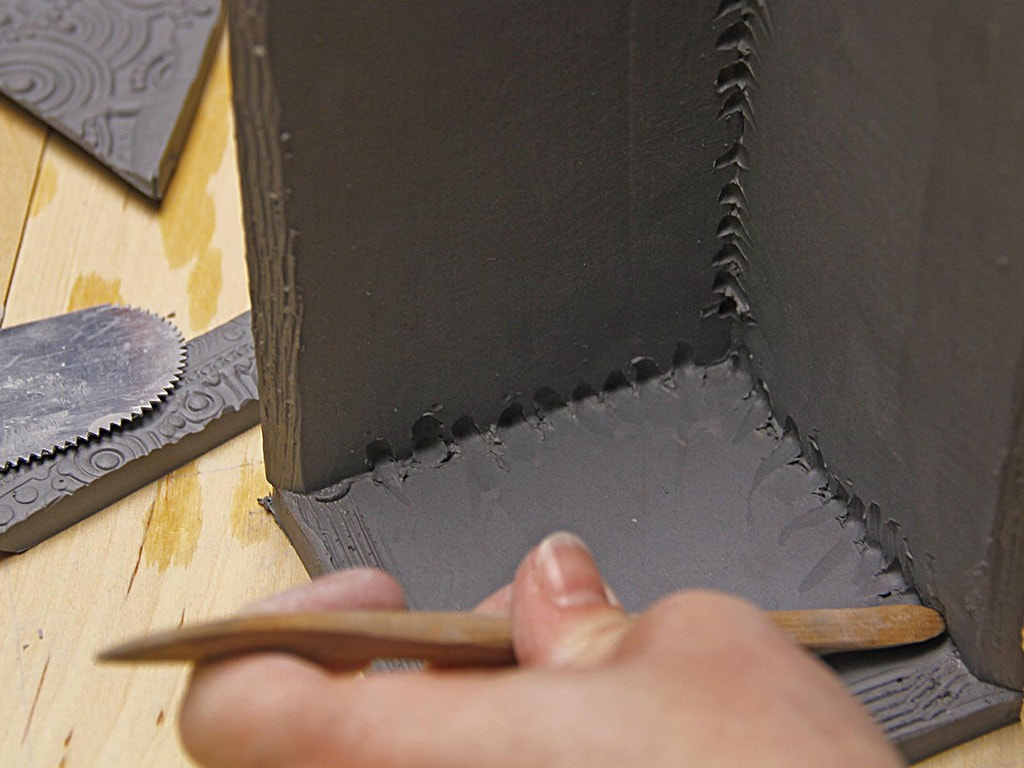
​working with a soft slab -- write these tips on your notes
tips -
roll in pattern first!
cut the shape bigger than the cup!
put the slab around the paper cup loosely so you can get it off!
this should take you no longer than 3 days.
​unlike what we've done working with a slab means using one large piece of clay so you need to handle it carefully.


see this link - how to make a soft slab cup 


check out the rubric on line!!!

adv & int.
What are the three techniques one needs to use to make a project tall?

watch the video
​

update your progress scale

9/19/2017


Get our your progress scale and mark down what you've gotten done. make sure it is up to date; I will check for a grade on Monday

on your tool kit notes write down what you've gotten done.

ex. beginners
pinch pot - bisqued waiting to be glazed
group coil - on bisque cart
personal coil - in locker almost done.

ex. int/adv
my bowls are bisqued and on my working blog.
my group coil is also on my work blog project on bisque cart. I have my first bowl on my grading blog- and in the case.
I have started my tall project - needs to be footed.

remember all your projects need to appear on your working blog before they are glazed.

What are the four ways to design a project? (before you add color)

9/18/2017


​- over all form
 - surface decoration - this can be part of the form or added or subtracted 'area' from the surface
 -creating negative space by carving into the surface and creating 'transparency'
- changing the top edge so that it does not describe a plane

Picture

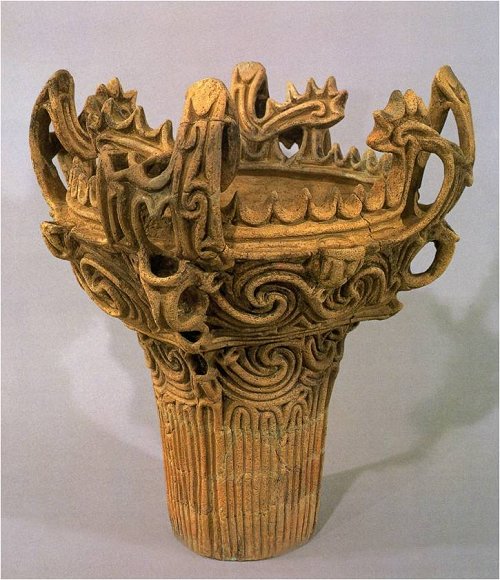
change up the top edge

Picture
Picture

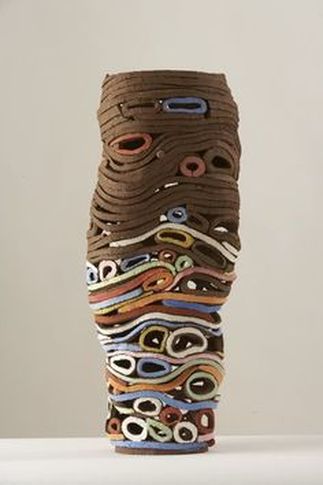
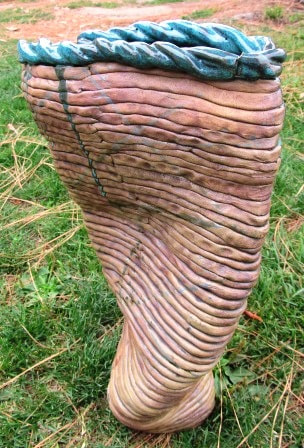
forms can bend - balance doesn't have to mean straight
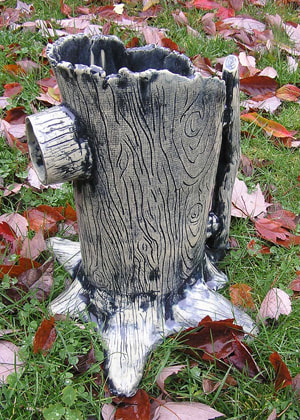
Picture

negative space can create transparency

change our expectations for the base

<<Previous

    Ms. Heideman

    Master of Fine Arts

    Archives

    January 2018
    December 2017
    November 2017
    October 2017
    September 2017
    August 2017
    June 2017
    May 2017
    April 2017
    March 2017
    February 2017
    January 2017
    December 2016
    November 2016
    October 2016
    September 2016
    August 2016
    June 2016
    May 2016
    April 2016
    March 2016
    February 2016
    January 2016
    December 2015
    November 2015
    October 2015
    September 2015
    June 2015
    May 2015
    April 2015
    March 2015
    February 2015
    January 2015
    December 2014
    November 2014
    October 2014
    September 2014
    June 2014
    May 2014
    April 2014
    March 2014
    February 2014
    January 2014
    December 2013
    November 2013
    October 2013
    September 2013
    June 2013
    May 2013
    April 2013
    March 2013
    February 2013
    January 2013
    December 2012
    November 2012
    October 2012
    September 2012
    August 2012
    June 2012
    May 2012

    Categories

    All

    RSS Feed

Powered by Create your own unique website with customizable templates.