AHEIDEMANART.com
  • home
  • Ceramics
    • Ceramics daily blog >
      • ceramics clean up
    • Projects assigned >
      • project progress scales
    • ceramic videos >
      • video demos
      • Aheidemanart on youtube
    • Ceramics documents..
    • ceramics rubrics & scales
    • hand project still demos
  • 2D art
    • Drawing and painting blog
    • 2d class documents
    • drawing & painting tutorials
    • rubrics
    • 2-Dimensional scales
    • 2d assignments
    • extra credit in 2D
  • File Cabinet
    • philosophy of education
    • Course content
    • art elements
    • rules >
      • rules of the road
      • the fine print
      • Classroom covenant
    • Grading >
      • Work Log
      • project sheet
      • writing a paragraph
      • end of quarter self - evaluation
      • end of the SEMESTER evaluation
      • presentations learning targets
      • clean up ticket
    • Teamwork >
      • employablitity skills grading worksheet
    • scheduals >
      • bell scheudal
      • FINALS SCHEDUAL
      • afternoon assembly schedual
      • confrence shedual
    • substitute teacher info
    • what is ms. h like, anyway?
    • how to make a weebly site
  • Links
    • contact page
    • student blogs
    • advanced & AP 2013-14
    • link to model advanced page
    • link to 'vintage' site
  • Galleries
    • 2D gallery
    • Ceramics
    • Advanced ceramics
    • RAKU!
  • AP student info
  • tutorials
  • Ann talks
  • events!! Blog
  • festival of the arts entry form
  • ceramics club page
  • 2d gallery
  • 2 d gallery blog
  • scheduals
  • parent events
  • New Page

How do kilns work and why are they different?

2/28/2017


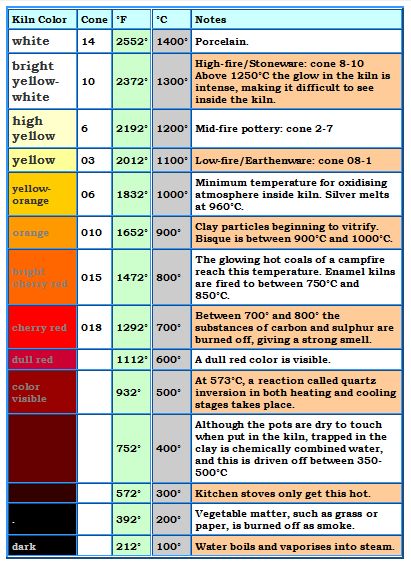
What are the two basic fierings called and why are they different?*

What are the basic kinds of kilns and why are they different?**

What are some basic glaze firing techniques we can do here?***


* bisque - first fire cone 04 aprox. 1800 degrees F
glaze - second fire for us cone 5-6 aprox 2100 degrees F

**kilns are either electric or fuel fired - they burn gas, wood, charcoal or other.

***One can get clay and glazes to use specifically at a variety of temperatures - see chart below
low fire - often used in elementary school or bright colored table ware cone 04-02.
mid range 3-6 ---this is where we normally fire - can use as dishes
high fire 8-10. -- we can fire this hot in the gas kiln with specific clay for specific needs. Available for A.P. and continuing advanced students.

Picture
Picture

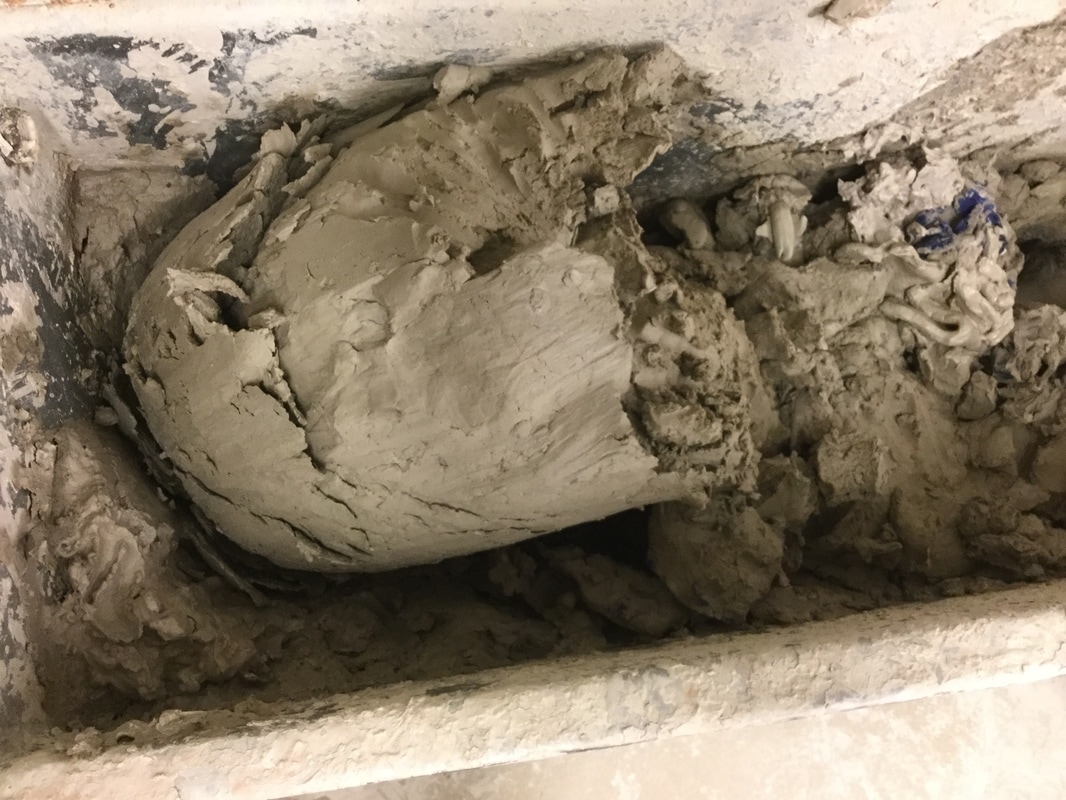
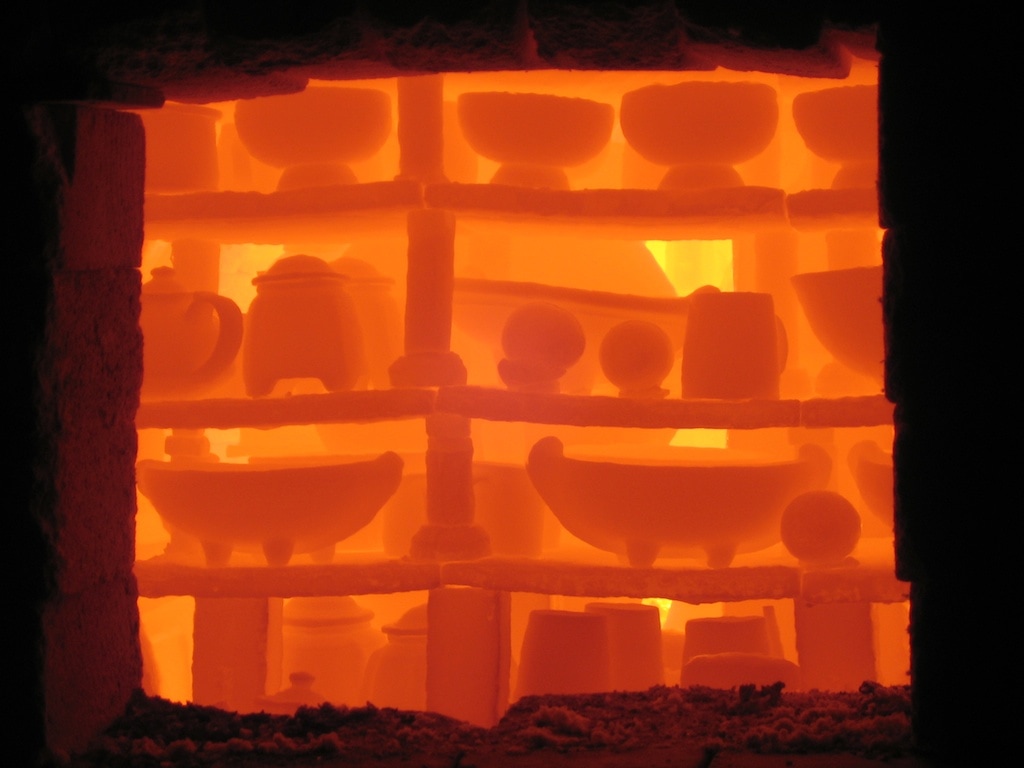
This is looking in a glaze kiln in process -- when it gets 'high yellow' the glaze is melted
and the clay body gets 'soft'
 -- it can subtly change in form
one of the reasons to fire lids on their base pots.

starting week five --- where should I be?

2/27/2017


Please find your progress scale and make sure it is filled out...
Everyone should have four 'yellow sheets' weekly tool kits that have been returned to you in your folder. You will need to turn these in at the quarter. Make sure you are checking the scale and rubrics for each project -- that is something you need to do... :)
List on your tool kit what you've gotten done -
also, please put your number on the top left corner. :)

beginners ---
you should have -
a grade on your pinch pot
and group coil
personal coil should be in the bisque or glaze
soft slab cup should be about to dry or drying
you should start on your firm slab
​demo here
and here

int/advance - you should have
first project & group coil on your grading blog
projects, 2, 3 & 4 on your working blog
you should be starting project 5 this week. remember all projects need to be on your working blog in progress so we can keep track of them.

How long can you keep a project in workable clay?

2/17/2017


I can keep clay wet and workable as long as I like as long as the plastic bag is sealed.

When I  make something before a week-end or break I will MAKE SURE it is wrapped up in plastic because if it dries out I will have to put it in the bucket to get recycled.

I will put my class list number in the upper left hand corner of the paper so Ms. H can alphatize them more better easily. :)  
Hint -- listen as Ms. H tells you your class roster #
Note Beginners put a B in front of the the #, Intermediate put an I and Advanced put an A in front of the number. Thank you very much!!!


how does the clay mixer work?

2/17/2017


the mixer is basically a big box with  blades on a central auger - much like a large drill. It pulls the clay back and should spin it into a 'shell' of clay on the right side.
I WILL make sure the clay mixer is turned on when we are working - turn it off when you put your hand in!!!!
 I must turn the red handle toward the wall to keep it mixing the correct way.
DO NOT BLOCK up the right side with clay.
also --- see below pics for firm slab information

Why is a firm slab different than a soft slab?

- for a firm slab one cuts out the shapes and then lets them get firm before putting them together.
​-the project should have straight flat walls.

demo here
and here

I will not leave my brushes out and or upside down in a jar

2/15/2017


If I get something out, or if Ms. H gets it for me, I will put it back. I will make sure my brushes are brush end up so they don't get ruined.

 <3 how to write a ceramics paragraph <3   

2/14/2017


When I write about my work to turn in -- I will write  paragraph in this order ---
what is it - the media - in this case describe the project
form - surface - color --- in that order

how we made it - the skills
how it uses art elements - focus on one or two
to create design elements that create a composition that
shape the viewer's experience of it is -

in other words how it makes them feel, react or  how it makes them think.  - remember the 3 parts of the brain. :)

here is an example

starting your third project soft slab cup, tall project

2/13/2017


working with a soft slab --
unlike what we've done working with a slab means using one large piece of clay so you need to handle it carefully.
see this link - how to make a soft slab cup
tips -
roll in pattern first!
cut the shape bigger than the cup!
put the slab around the paper cup loosely so you can get it off!
this should take you no longer than 3 days.

adv & int.
What are the three techniques one needs to use to make a project tall?

check out the rubric on line!!!

- keep the base small
-pull up in sections
- between pulls

track your progress

2/10/2017


Get our your progress scale and mark down what you've gotten done. make sure it is up to date; I will check for a grade on Monday

on your tool kit notes write down what you've gotten done. Then put it in the basket.    :)


​ ​ex. beginners
pinch pot - bisqued waiting to be glazed
group coil - on bisque cart
personal coil - in locker almost done.

ex. int/adv
my bowls are bisqued and on my working blog.
my group coil is also on my work blog project on bisque cart. I have my first bowl on my grading blog- and in the case.
I have started my tall project - needs to be footed.

remember all your projects need to appear on your working blog before they are glazed.

how do I glaze a project?

2/9/2017


​glaze is the layer of 'glass' we fire onto clay to make it impervious to water and other substances.

glaze is made largely of silica, alumina, and clay as well as a metal compounds, for color. For instance  copper oxide will make green, iron oxide can make black or deep reds.

Glaze particles are suspended in water, put on the project and then fused into the clay surface in the kiln.

​please see - how to glaze here.

​
for your first pinch and coil projects you will do a base color that will show texture - then add clear and detail colors as desired. 

​Beginners start individual coil projects today - instructions are here

please find the rubric and scale under the rubric and scales tab

some examples  
​http://rachaelsart.weebly.com/ceramics.html

what are the four ways to design a project?

2/8/2017


​- over all form
 - surface decoration - this can be part of the form or added or subtracted 'area' from the surface
 -creating negative space by carving into the surface and creating 'transparency'
- changing the top edge so that it does not describe a plane

Picture
Picture
Picture
Picture

two hours late

pd. 1  940 - 910
pd. 2 10:16-10:50
pd 3  10:55 - 11: 25

pd 4 11:55 - 12:35
first lunch to 11:55
second lunch 12:25
pd 5 12:40 - 1:25
pd 6 1:30 - 2:19

<<Previous

    Ms. Heideman

    Master of Fine Arts

    Archives

    January 2018
    December 2017
    November 2017
    October 2017
    September 2017
    August 2017
    June 2017
    May 2017
    April 2017
    March 2017
    February 2017
    January 2017
    December 2016
    November 2016
    October 2016
    September 2016
    August 2016
    June 2016
    May 2016
    April 2016
    March 2016
    February 2016
    January 2016
    December 2015
    November 2015
    October 2015
    September 2015
    June 2015
    May 2015
    April 2015
    March 2015
    February 2015
    January 2015
    December 2014
    November 2014
    October 2014
    September 2014
    June 2014
    May 2014
    April 2014
    March 2014
    February 2014
    January 2014
    December 2013
    November 2013
    October 2013
    September 2013
    June 2013
    May 2013
    April 2013
    March 2013
    February 2013
    January 2013
    December 2012
    November 2012
    October 2012
    September 2012
    August 2012
    June 2012
    May 2012

    Categories

    All

    RSS Feed

Powered by Create your own unique website with customizable templates.